AI Image Extender: How to Expand Any Photo Beyond Its Borders
You have the perfect photo, except it is the wrong shape. It is a vertical portrait, and your website banner needs a wide landscape. Or it is a tight square, and the design needs breathing room for a headline. Cropping would cut out the subject, and stretching would distort it. This is the exact problem an ai image extender solves: it paints new picture beyond the edges of your photo, so the frame grows without the subject shrinking or warping.
The technique behind it is called outpainting, and it has moved from specialist software into free online tools in the last few years. This guide explains how it works, when it is worth using, how to get a clean result, and where it still falls short, so you can judge an extended image with your own eyes instead of trusting a tool’s preview.
What Outpainting Actually Does to Your Photo
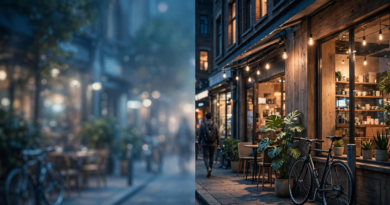
When you extend ai image borders with an outpainting tool, the tool does not stretch your pixels. It keeps your original photo untouched in the centre of a larger canvas, studies the edges of that photo (the colours, textures, light direction, and perspective), and then generates new pixels that plausibly continue the scene. A field gains more field. A wall gains more wall. A sky gains more sky.
That is why people use several names for the same thing. An image extender ai tool, an ai photo extender, and an ai picture extender are all describing outpainting, and ai outpainting is simply the technical name for it. When you search, you will also meet the phrase ai image extend, which is the same job described as a verb. Do not let the different labels confuse you: if a tool adds new scene beyond the border, it is an extender. If it only makes the same scene bigger or sharper, it is not.
Most tools work in one of two ways. Some let you drag the canvas edges outward in any direction, top, bottom, left, or right, and fill the new space. Others ask you to pick a target shape, such as 16:9 for a banner or 9:16 for a story, and then fill whatever space that shape adds. Both approaches end in the same place: your original photo, plus generated scenery around it.
When Extending Helps, and When It Will Not
Extending works best when the missing area is guessable. The tool can continue a plain sky, a grass field, a studio backdrop, a beach, or a softly blurred background with convincing results, because those areas follow simple patterns. It struggles when the missing area has to contain something exact: a person’s hands, a face turned at an angle, readable text, a logo, jewellery, or a repeating architectural pattern. Small errors in those areas are obvious at a glance, while a slightly wrong patch of sky goes unnoticed.
Here are the jobs where extending earns its place:
- Turning a square product photo into a wide website hero without cropping the product.
- Converting a vertical portrait into a landscape banner by adding scenery on both sides.
- Adding headroom above a portrait or space beside a subject for a headline or caption.
- Adapting one good photo to several platform shapes, such as a story, a post, and a banner, without reshooting.
- Rescuing a photo framed too tightly, where a shoulder, a roofline, or a tree was cut off at the edge.
And here are the jobs where it is the wrong tool: enlarging a small photo to print size (that needs upscaling, not new scenery), fixing a blurry photo (extending adds new pixels around the blur, it does not sharpen the original), or recreating a specific real detail that was never photographed, such as a missing sign or a person’s exact features. In those cases the tool will invent something plausible, and plausible is not the same as true.
How to Extend a Photo With AI, Step by Step
The steps below follow the pattern used by most online extenders, including free ones. The exact buttons differ between tools, but the order stays the same, and the order is what protects your result.
Start with the best original you have. An extender cannot improve a low quality source, and any blur or noise in the original will sit next to crisp generated scenery, which makes the join more visible. If your photo is blurry, fix that first: our guide on how to make a blurry picture clear covers the options before you extend.
- Choose the final shape first. Decide the exact ratio your design needs, such as 16:9 for a banner or 1:1 for a marketplace square, before you generate anything. Extending without a target shape produces extra scenery you will only crop away later.
- Upload the original at the highest resolution available. A larger source gives the tool more edge detail to continue from, and it keeps the original part of the result sharp.
- Extend only the edges you need. Add space where the design needs it, and leave the other edges alone. A small, deliberate extension looks far more natural than a photo doubled in every direction.
- Write a short continuation prompt when the tool offers one. Describe what should continue, not a new scene. For example: continue the wooden table and soft window light to the right, empty background, no text, no people. Short, concrete prompts beat long imaginative ones here.
- Generate, then inspect the seam at full size. Zoom to 100 percent and look along the original border. Check for duplicated objects, bent lines, wrong shadows, and texture that suddenly changes character.
- Repair or regenerate the weak spots. If one side looks wrong, try a smaller extension on that side, or regenerate that side alone if the tool allows it. Do not accept a flawed side just because the other side looks good.
- Export, then do your final crop and resize. Extend first to get the composition right, then resize to the exact pixel size your platform needs. Resizing before extending only throws away the detail the tool needs.
Many people look for an ai image extender free option or an ai image extender for free to test the idea before paying. Free tiers do exist, and they are a sensible way to try the workflow, but they usually limit how many images you can extend, the export resolution, or both. If a free result looks good at preview size but soft at full size, check the export settings before blaming the tool. For a well documented free starting point, see Wixel’s AI image extender, which lets you drag edges outward in any direction and offers a free tier with monthly AI credits. As with any free tool, check its current limits and terms before uploading work you cannot afford to lose, since free plans change.
Getting a Clean Seam: Small Passes Beat Big Jumps
The seam, the line where your real photo meets the generated scenery, is where extended images succeed or fail. The most reliable habit is to extend in small passes. A modest extension gives the tool less to invent, so it stays closer to the real textures and light. If you need a large extension, do it in two or three passes, checking the seam after each one, rather than asking for the whole jump at once.
Give the tool good evidence at the edge. The model continues from the pixels near the border, so an edge that already contains texture, light, and direction produces a better continuation than an edge that is flat or empty. If your photo’s edge is a blank wall, that is fine, but do not expect the tool to invent an interesting scene there. It will continue the wall, faithfully and boringly, which is usually what you want.

Watch for the classic tells of a bad extension. Duplicated objects are the most common: the same tree, window, or pattern appearing twice, once real and once generated. Next come perspective errors, where a generated floor or horizon line tilts away from the original. Then come lighting errors, where shadows fall in a different direction in the new area. Any one of these is a reason to regenerate that side, not to publish and hope nobody notices.
A useful final check is to step back, literally. View the image at the size it will actually appear, on the page or post where it will live. A seam that is obvious at 200 percent zoom may be invisible at banner size, and a flaw that is invisible in the editor may jump out once a headline sits on top of it. Judge the image in its real context, not in the tool’s preview.
Extender, Upscaler, or Crop: Picking the Right Tool
Confusion between these three tools causes more bad results than any single extender flaw. They solve different problems, and using the wrong one guarantees disappointment.
| Tool | What it changes | Use it when |
|---|---|---|
| Image extender (outpainting) | Adds new scene beyond the borders | You need a different shape or more background room |
| Image upscaler | Increases resolution of the same scene | You need a bigger, sharper version of the same photo |
| Cropping | Removes outer parts of the photo | You need a different shape and can afford to lose edges |
If you only need a sharper, larger version of the same framing, read our guide on how to upscale an image without losing quality instead of extending. And if you are choosing between an ai image extender online free tool and a paid one, judge by the export: a free tool that exports at full resolution with a clean seam beats a paid tool that exports a small, watermarked file.
When you want to ai extend photo files in a batch, such as a product catalogue, test the workflow on three or four varied photos first, not just the easiest one. A tool that handles plain studio backgrounds beautifully may struggle with patterned packaging or reflective surfaces. A short test batch tells you the truth before you commit a whole catalogue to it.
Limits and Honest Warnings
Extended scenery is generated, not photographed. That has practical consequences worth stating plainly. Do not use an extended image as evidence of a real place, a real product detail, or a real person, because the new areas show what the tool guessed, not what was there. For product listings, keep the product itself untouched and extend only the background, so buyers see the real item.
Rights and disclosure matter too. You should only extend photos you have the right to edit, and you should avoid generating recognisable people, logos, or trademarks in the new area without permission. Some platforms and clients require AI edits to be disclosed, so check the rules where the image will be published rather than assuming nobody will ask.
Finally, keep your original file. Save the unextended photo separately, and save the extended version as a new file. If a platform changes its required shape later, you can re-extend from the original instead of extending an already extended image, which compounds errors with every generation.
A Short Pre-Flight Checklist
- Final ratio decided before generating, not after.
- Highest resolution original uploaded, blur fixed first.
- Only the needed edges extended, in small passes.
- Short continuation prompt, no new scene invented.
- Seam inspected at 100 percent for duplicates, perspective, and lighting.
- Image judged at its real display size, in its real layout.
- Original file kept untouched, extended version saved separately.
If you want to explore more free image and AI tools, browse the Techlspro tools page. For anything beyond extending, such as sharpening or resizing, use the dedicated tool for that job rather than asking an extender to do work it was not built for.
Outpainting Questions You Will Ask Before Your First Extend
What is AI outpainting?
Outpainting is the technique behind an AI image extender. The tool keeps your original photo intact, then generates new pixels beyond its borders that continue the scene’s colours, textures, lighting, and perspective.
Does extending change my original photo?
No, not in a well built tool. Your original pixels stay in the centre of the new canvas, with only a narrow blending zone at the border to hide the join. The new content appears around them, not over them.
Can I turn a portrait photo into a landscape banner?
Yes, this is one of the best uses. Add generated scenery on the left and right sides, keep the subject centred, and check the seam on both sides before exporting.
Why does my extended image look fake?
Most often the extension was too large in one pass, or the missing area needed exact detail such as hands, text, or a pattern. Try a smaller extension, a simpler edge, or a tighter prompt, and inspect the seam at full size.
Is an AI image extender the same as an upscaler?
No. An extender adds new scene and changes the composition. An upscaler keeps the same scene and increases its resolution. Use an extender for shape and space, and an upscaler for size and sharpness.
Start Small, Then Go Wide
An AI image extender is at its best as a quiet problem solver: it turns a good photo in the wrong shape into a good photo in the right shape, without cropping the subject or stretching the scene. Start with a clear target ratio, extend in small passes, inspect the seam honestly, and keep the original safe. Do that, and most of your extensions will look like wider photographs rather than edited ones. Skip those steps, and the tool will happily invent scenery that nobody believes. The difference is not the tool you pick. It is the care you take before you click generate.
- ChatGPT Projects Explained: Organise Your Chats, Files, and Instructions in One Workspace - November 17, 2026
- Best AI Homework Helper: How Students (and Parents) Can Pick One That Teaches, Not Just Answers - November 17, 2026
- AI Image Extender: How to Expand Any Photo Beyond Its Borders - November 8, 2026